In order to respect users’ privacy, businesses advertising to users in the European Economic Area (EEA) must communicate end-users’ consent choices. Google has introduced an updated tool called Google Consent Mode v2 to address this.
What is Consent Mode v2?
Consent Mode v2 is an enhanced feature (it’s an API) introduced by Google that helps businesses adjust how their Google tags behave based on the consent status of their users. Essentially, it allows your website to measure conversions and gather insights while respecting users’ privacy choices. This is particularly important in light of GDPR and other privacy regulations that have reshaped the digital marketing landscape in the UK, Europe and beyond.
How Does Consent Mode v2 Work?
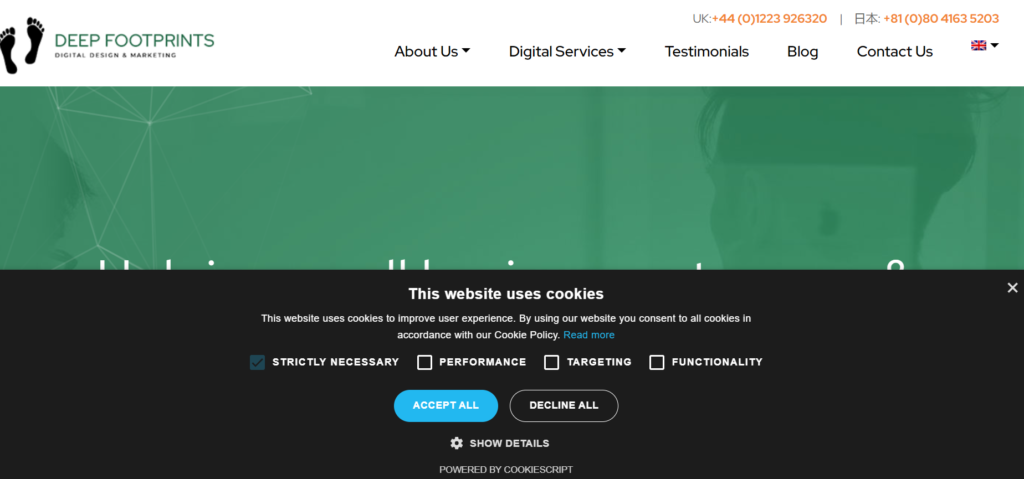
When a user visits your site, they are prompted to give consent for cookies and other tracking technologies. If you are a UK business and do not yet have a proper consent banner in place on your website then you are currently not compliant with European or British data protection laws and need to get this set up.

Consent Mode v2 works by modifying the behaviour of Google tags based on the consent status. Consent mode v2 has four main tag settings:
- Ad_Storage: asks the users if they consent their data being used for advertising purposes.
- Analytics_Storage: asks the uses if they consent their data being used for analytics purposes.
- Ad_user_data: asks the users if they consent their personal data being used for advertising.
- Ad_personalization: asks the users if they consent their data being used for remarketing.
If a user consents to cookies, your tags will work as usual. If they do not consent, the tags adjust accordingly, ensuring no cookies are used while still enabling essential functionalities, such as reporting and conversion tracking through aggregated data. Additionally, Consent Mode v2 introduces new functionalities that enhance data collection and accuracy without compromising user privacy.
Why is it important?
- Compliance: Consent Mode v2 helps your business stay compliant with GDPR and other privacy regulations. By respecting users’ choices and ensuring that data collection aligns with legal requirements, you can avoid hefty fines and build trust with your audience.
- Respecting User Privacy: It empowers users to control how their data is used for advertising, fostering trust and potentially improving brand perception.
- Lost Conversions Modelling: Even without full cookie consent, Consent Mode v2 allows for data collection in a way that ensures you still receive valuable insights. It can use advanced modelled conversions and behavioural signals to estimate conversion rates, helping you make informed decisions even when data is limited.
- Future Privacy Features: Consent mode is part of Google’s future privacy efforts, including upcoming features for measuring user behaviour without relying on cookies.
Implementing Consent Mode v2
1. The first step is to set up a consent banner to obtain user consent. This can be done using one of Google’s Consent management platform (CMP) partners OR directly via your CMS (such as Shopify, BigCommerce etc.)
If you use a CMS such as Shopify to set up a consent banner then you still need to use a CMP to send the consent choice to Google otherwise your developer will have to manually send the consent choices to Google. So it is recommended to use a CMP for setting up a consent banner too.
2. Set up consent mode to send user choices to Google: This can be done using one of Google’s Consent management platform (CMP) partners and Google Tag Manager. Click here to see the complete list of CMP Partners.
Once you open an account with a CMP partner, you can set up a consent banner by logging into your account and then can set up the consent mode with Google Tag Manager. See below step by step guide to set up consent mode using Cookiescript and GTM.
With Consent mode v2, Google’s in-house tags such as Google ads and Google Analytics adjust their behaviour automatically based on users’ consent preferences. For example, if a user does not give consent to tracking then Google analytics will adapt to this consent and limit data collection.
Other tags such as Facebook or third party analytics will require a bit more work in GTM as consent related configuration is not set up by default for them and so you may need to configure these tags.
Step by step guide to implement Consent Mode v2 Using Cookiescript and GTM
Step 1. Open an account with Cookiescript and configure the consent banner. This step is straight forward and self explanatory. All you need to do is enter your website URL and configure the style of the banner.
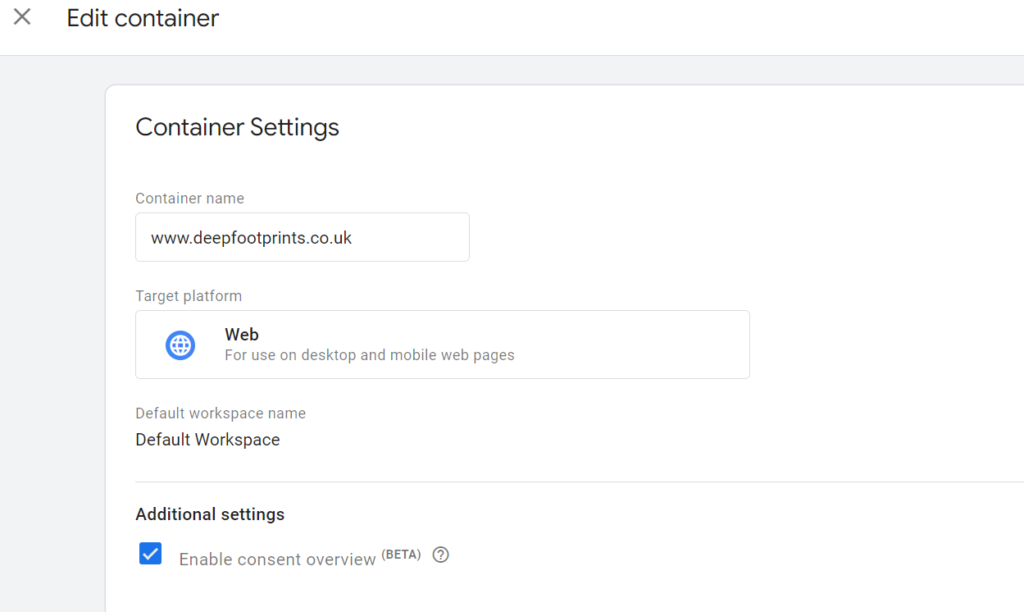
Step 2. Configure GTM to use consent mode. Click on Admin and then Container Setting.

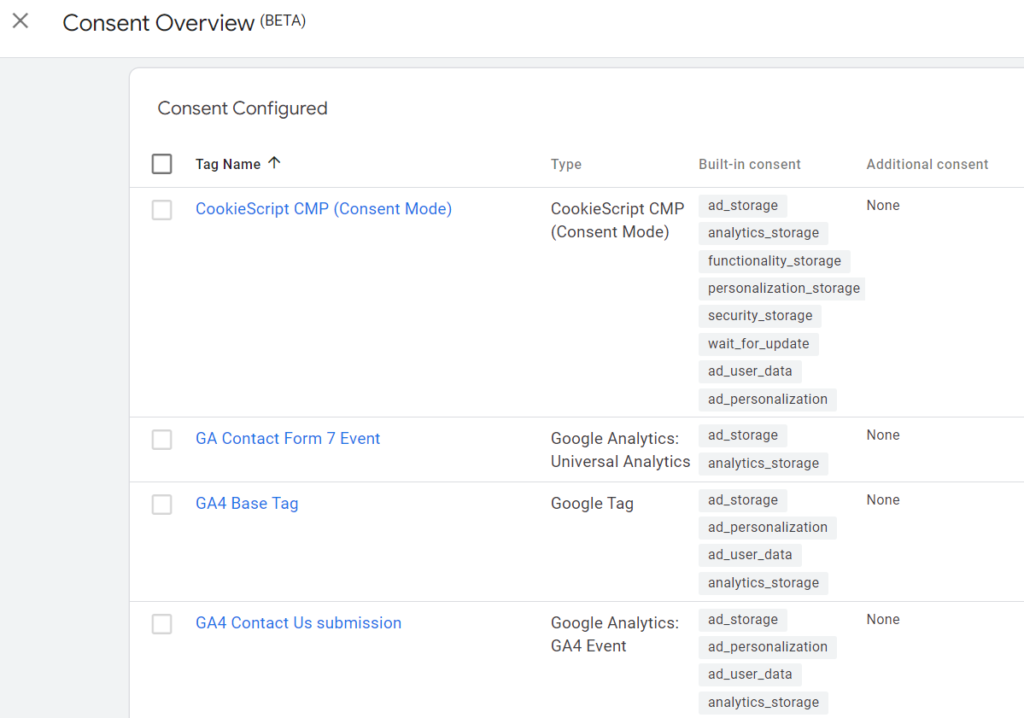
Step 3. Click on Enable consent overview and then save the container. This provides a high level view of all the consent settings across the tags in your container
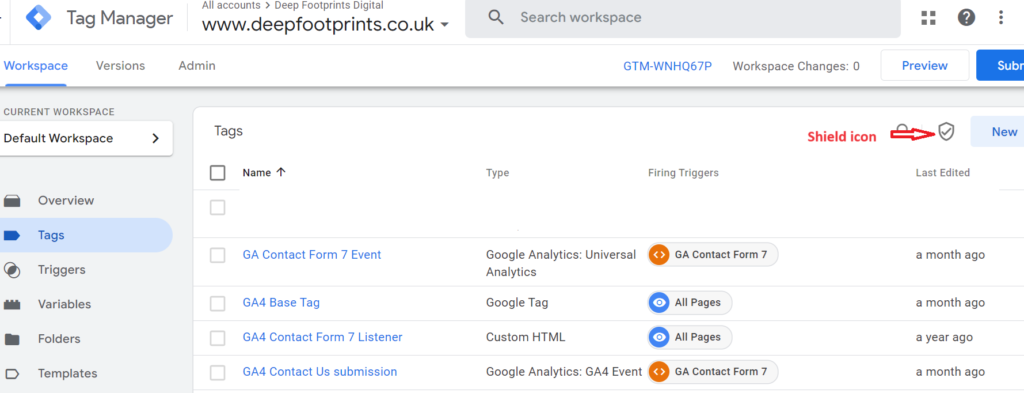
Step 4. Click on workspace and then tags. Then click on the shield icon which will show all the tags where the consent is not configured. All these tags need to be reviewed.
Step 5. Before we review the tags for consent not configured, let’s add Cookiescript template to the GTM account. For this, click on ‘Templates’ and click on ‘Search Gallery’ and then search for ‘Cookiescript’. Once found, click on ‘Add to work place’ to add Cookescript CMP template.
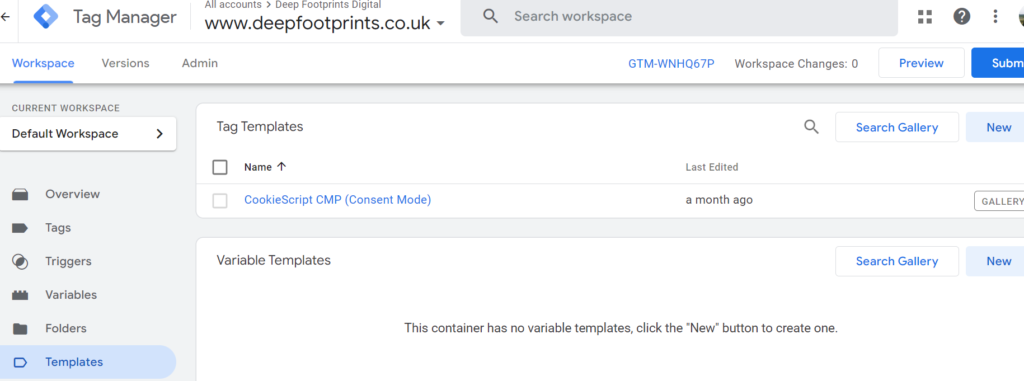
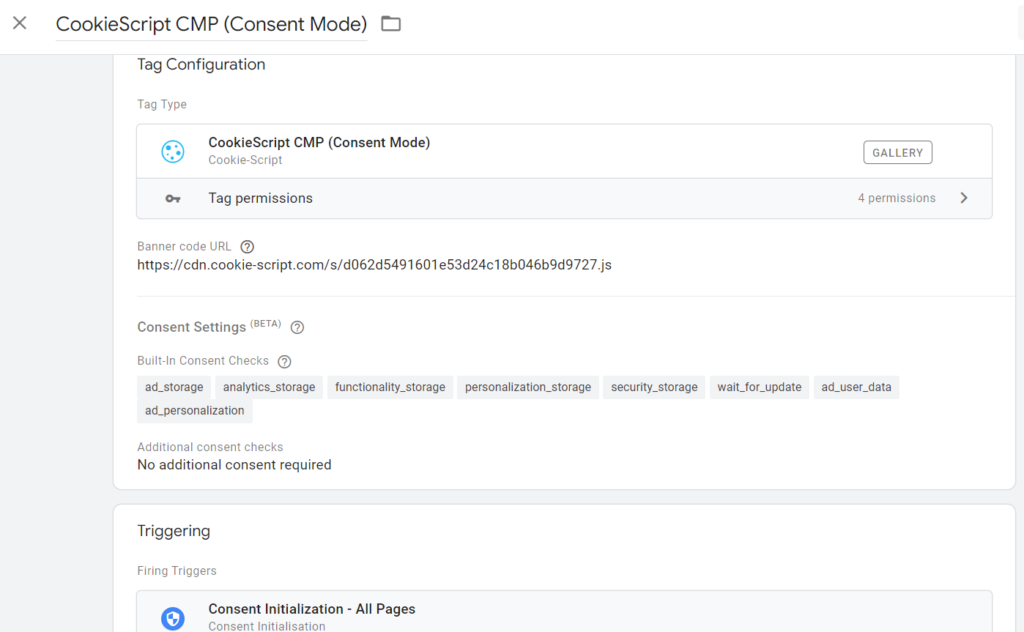
Step 6. Go back to the ‘Tags’ section and click on ‘New’ to create a new tag. Name the tag ‘Cookiescript’ and select Cookiescript CMP as the tag type. Under the banner code URL, add the URL from your Cookescript account.
You can see under Built-In Consent Checks, the consent state will be set to denied by default for all of the consent mode parameters. Leave this and all other settings as it is.
Then go to Triggering and choose ‘Consent Initialization – All Pages’ trigger. This will ensure Cookiescript is loaded before any other tags. Save this tag. This will ensure the Cookiescript tag automatically adjusts for Google tags as they already have built-in consent settings.
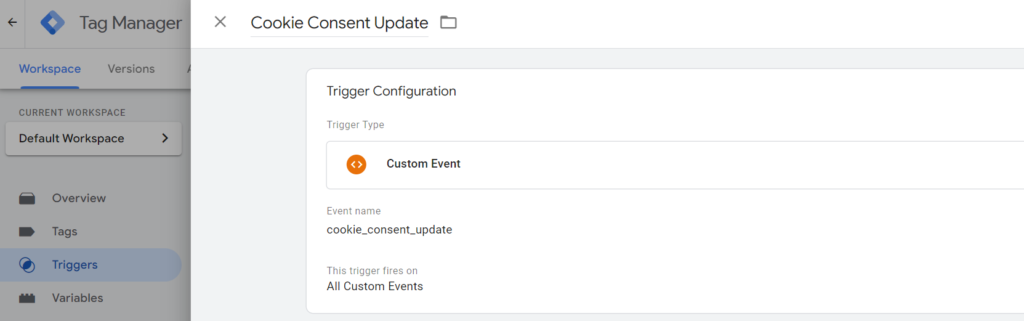
Step 7. For any non-Google tags which don’t have built-in consent settings, we need to create a new trigger. Click on ‘Trigger’ and then click on ‘New’. Give the name as ‘Cookie Consent Update’. Select ‘Custom Event’ as trigger type and add cookie_consent_update as event name. Save the trigger.
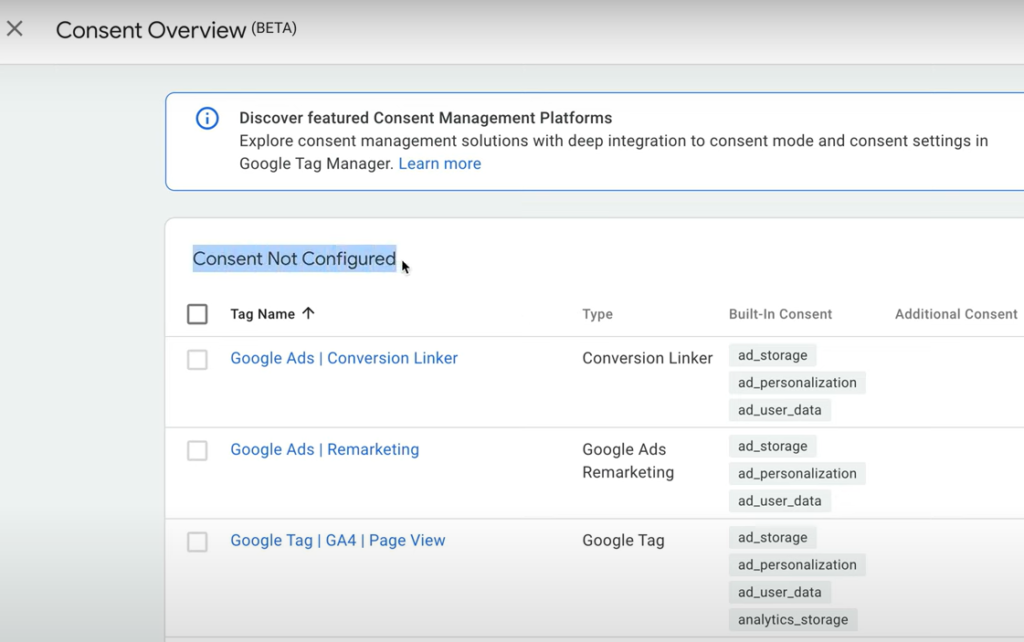
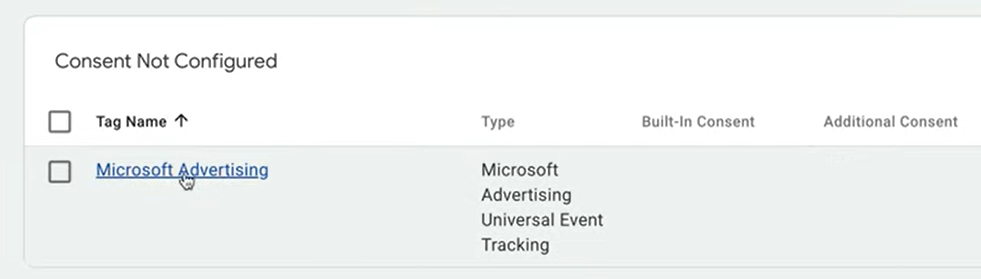
Step 8. Click on ‘Consent Overview Shield’ icon from the tags section as shown in step 4. We need to review all the tags under ‘Consent Not Configured’.
For all the tags that have values under ‘Built-in Consent’ column can all be configured together. Select all these tags and click on the shield icon on the top.
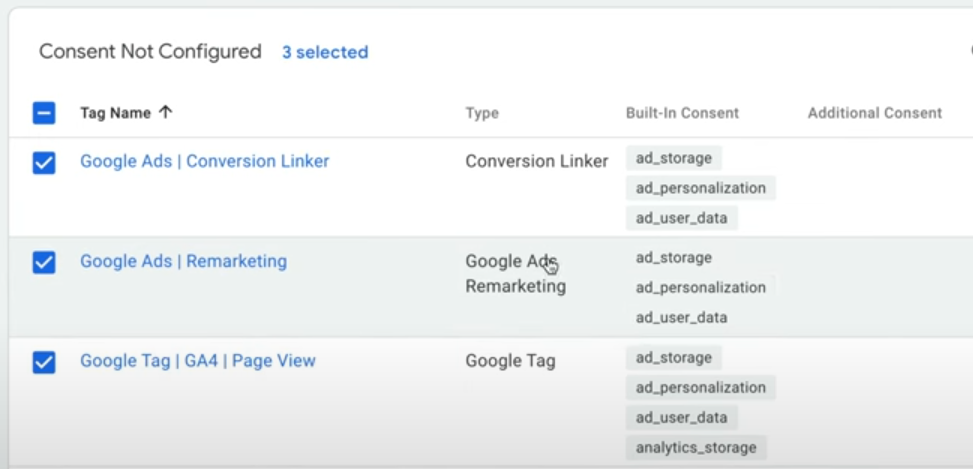
Click on ‘No additional consent required’ and then click save.
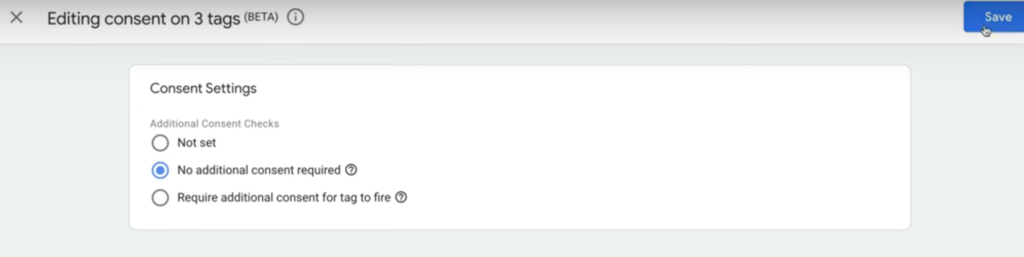
This will move all the tags to ‘Consent Configured’ section.
Step – 9 Then open any non-Google tag such as Facebook or Microsoft ads.
Click on ‘Required additional consent for tag to fire’ and then click on ‘Add required consent’.
Add ‘ad_storage’, ‘ad_personalization’ and ‘ad_user_data_ parameters.
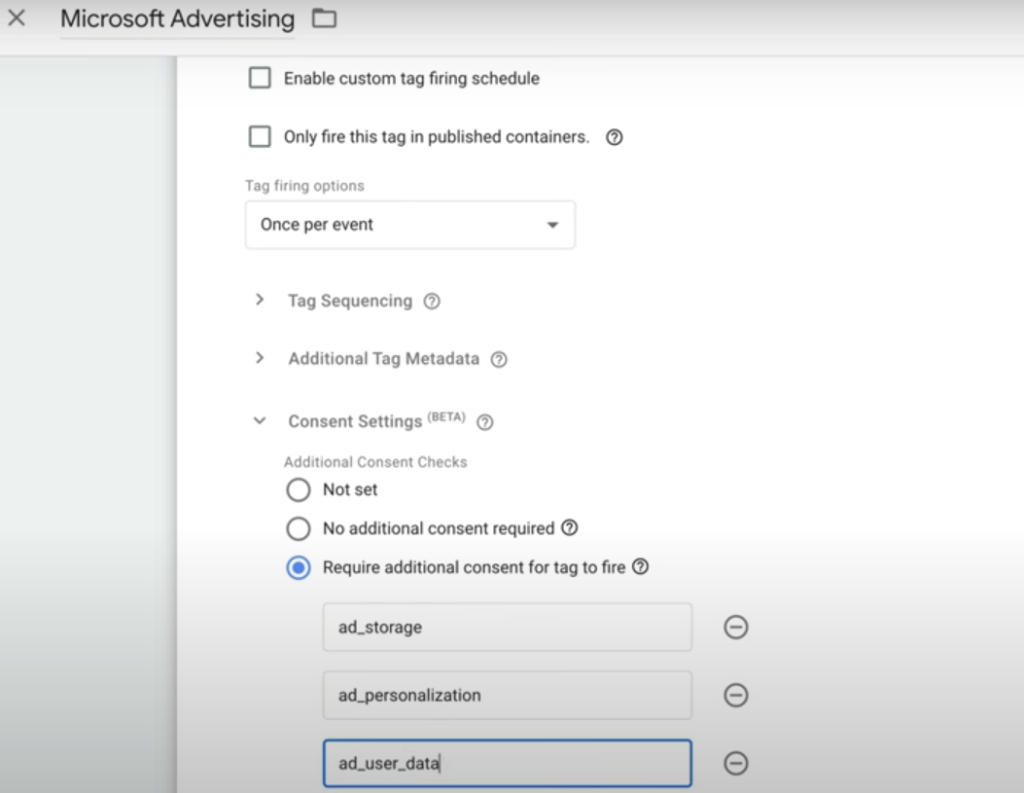
Under trigger, add ‘Cookie Consent Update’ trigger. This will make sure that the tag will only fire once the consent has been given.
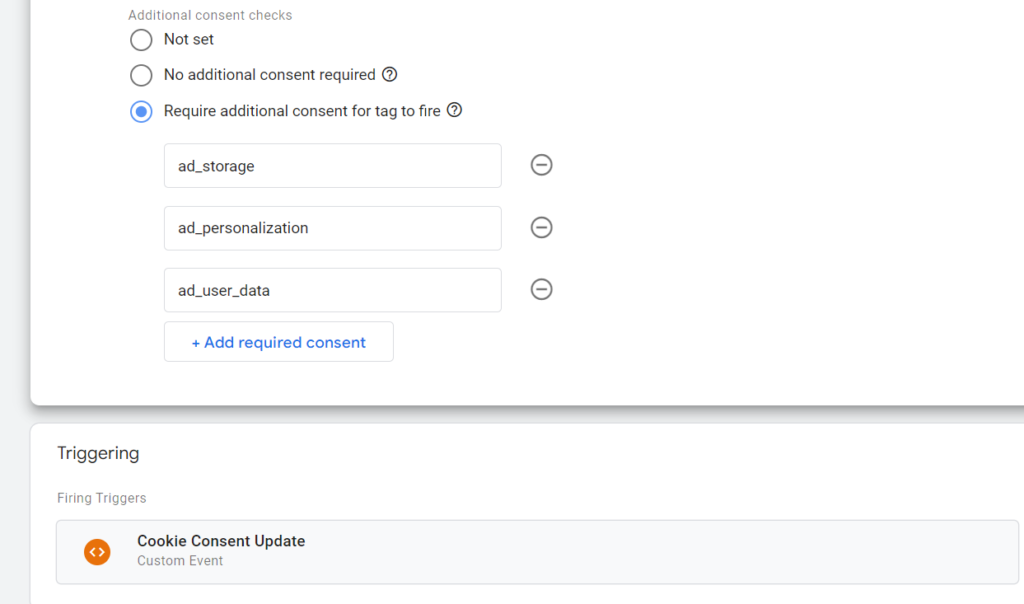
Once you save the tag, it should move to ‘Consent Configured’ section. Follow this process for all non-Google tags where the consent is needed.
Once you publish the tag after testing it properly, the consent banner should appear on your website and the consent data should be available in your Cookiescript dashboard.
You may notice a drop in traffic in your Google Analytics account for a few days after implementing the consent banner and Consent mode v2 but this should not last more than 10 days as long as you meet Google’s criteria for modelling data on users that do not accept the consent banner. Read more here.
If you have any questiions about Google Consent Mode v2 then please let a question below or else contact us.