We have come across a common problem with Google Shopping / Performance Max campaigns.
Many (or most) of your products will not show up in your advertising efforts on the Google Shopping network. There is an inherent bias built into Google’s algorithm’s as of course they want to optimise budget towards the products that they are confident will convert.
But what about all of the other products that never get any impressions or clicks?
This is particularly challenging for retailers with hundreds or even thousands of products they want to showcase. This situation is similar to products in physical stores that sit at the bottom of shelves until they are placed in more prominent positions.
Simply throwing more budget at it won’t necessarily solve the problem, as Google tends to prioritize products that consistently convert and meet campaign goals. So, what can you do to improve the visibility of your underperforming products or products that have never been given a chance?
One solution that we stumbled upon recently is to create a new campaign exclusively for products that have received zero clicks, allowing you to increase awareness and drive more sales specifically for those items.
The Manual Approach Challenge: Implementing this strategy manually can be daunting, especially for stores with a large number of products. Trying to manually track and manage products on an ongoing basis poses several challenges. How frequently should you check the products? What timeframe should the campaign run for? How do you separate products that receive clicks from those that don’t? Moreover, finding the time to perform these manual tasks can add significant hours to your already busy schedule.
The Power of Automating using Google Ads scripts:
Introducing Google Ads Scripts To streamline and simplify the process, you can leverage the power of Google Ads Scripts. These scripts allow you to automate actions within your Google Ads account by entering JavaScript code.
Even if you’re not familiar with JavaScript or coding, you can still benefit from the existing scripts developed by knowledgeable individuals to automate various functions within Google Ads. We have the full script for you below. By utilizing these scripts, you not only save time but also gain more control and efficiency in managing your Google Ads account.
Understanding Google Ads Scripts:
Google Ads scripts are a powerful tool that can automate many tasks and optimizations required for running a successful Google Ads account. These scripts enable you to create, edit, or remove items in your account, making it easier to manage campaigns and achieve your advertising goals.
Considerations before you get started
- The sub-account feature in Merchant Center is designed to work seamlessly with supplemental feeds. However, this particular solution does not currently support the use of Content API Supplemental Feeds.
- To make use of a custom label (0, 1, 2, 3, or 4), you can utilize the supplemental feed to overwrite values.
- Before implementing the script for your account, it is advisable to conduct thorough testing, particularly if you anticipate a large SKU count exceeding 1 million. Keep in mind that Google Sheets has limitations on the number of cells that can be utilized, and scripts may time out when handling substantial amounts of data.
Getting Started: Step-by-Step Process
Step 1: Creating the Spreadsheet:
To begin, open the free Google Sheets application and create a new spreadsheet. Set “id” as the column header for column A1 and use the custom label you’re using in your script (custom_label 0-4) for column B1. Rename the tab as “LowVolume” and give the spreadsheet a descriptive name. This spreadsheet will serve as the foundation for your automated campaign.
This screenshot shows you how to do this:

Step 2: Adding the Script:
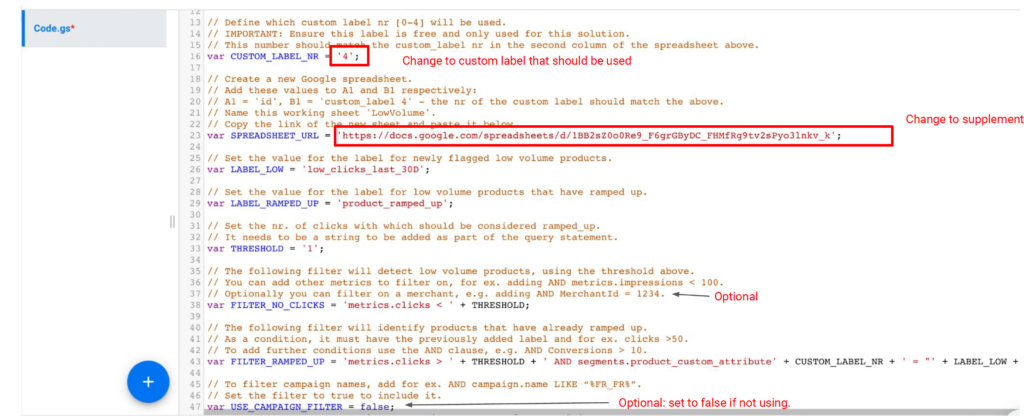
Access the “Scripts” section in your Google Ads account by clicking on Tools and Settings > Scripts. Click on the big blue button to create a new script. Copy and paste the provided script code into the script editor. Customize the script by giving it a name, specifying the custom label number you’re using (custom_label 0-4), and replacing the spreadsheet URL link with the link to your working spreadsheet. Determine the minimum number of product clicks required before considering them “ramped up” and removing them from the list. Save the script.

You will need to go to Github to get the script. Copy the script into the new Google Ads script you have created and edit it accordingly as shown below:

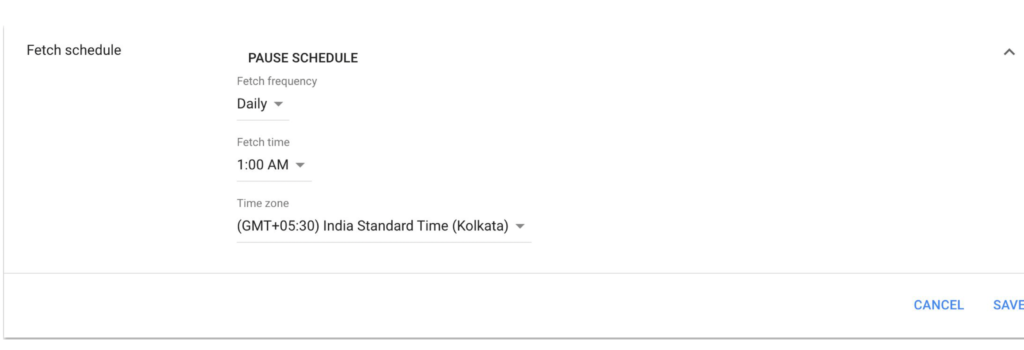
Then you just need to set the frequency of how often the script will run – once a day is fine:

Step 3: Adding the Supplemental Feed:
Navigate to your Google Merchant Center and under the Product menu, go to the Feeds section. Scroll down to the “Supplemental Feeds” section and click on “Add Supplemental Feed.” Provide a clear name for the feed and select Google Sheets as the feed source.

Choose the option to select an existing Google spreadsheet and select the spreadsheet you created in the previous step.

Next you need to schedule the feed to refresh at the same frequency as the script refreshes – set it an hour later:

Create the feed without selecting any product feed.
Step 4: Building the Campaign:
Congratulations on completing the preliminary steps! Now it’s time to create the Google Ads campaign to showcase the low-click volume products on the Shopping network. While setting up a Google Ads campaign is a familiar process, there are specific details to consider when creating your Low Click Volume Products campaign to maximize its effectiveness.
First, it’s recommended to use the Maximise Conversion value option when setting up your supplemental campaign. This option allows the campaign to run without restrictions, focusing on maximizing conversions. You can later test other options, such as adding a target return on ad spend (ROAS), depending on how well they align with your overall goals. We find it is best to wait until you have 10 or more conversions before doing so.
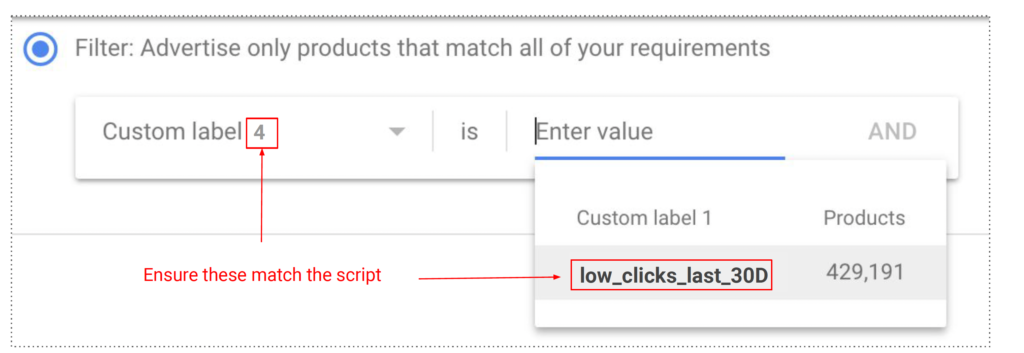
To ensure that only the products listed in your spreadsheet are included in the campaign, set up filters based on the custom label you chose for the spreadsheet – it needs to be selected through the listing group using custom label4, specifically under the custom label header in column B. By doing so, you can prevent any overlap between this dedicated campaign and other existing campaigns.
Using a custom label as shown below is the best way to do this:

Create a new Low Volume SKU campaign. Use the inventory filter to target the required custom label
The script will have respectively labeled low volume products using the same custom label.
To recap
You have followed a 3 step process:
- Identify Low Volume SKUs – Create a self refreshingGoogle sheet with the latest list.
- Label offers – Using a self refreshing Google sheet as a Supplemental Feed to label these items as Low Volume SKUs.
- Target offers – Use the Low Volume SKU label in the Google Ads interface, and then leverage an auto-bidding solution – again we recommend maximise conversions to start with.
You should now be all up and running.
The need to address product visibility is clear to any business running Google shopping/Performance Max campaigns. Having products that remain unnoticed can lead to lost opportunities.
By following the instructions outlined above and implementing the automated process into your Google Ads account, you can ensure that more of your products receive visibility and capture the attention of your customers.
By automating and optimizing your Google Ads campaigns, you can make better use of your time, improve the performance of your advertising efforts, and ultimately drive more sales for your business.

